

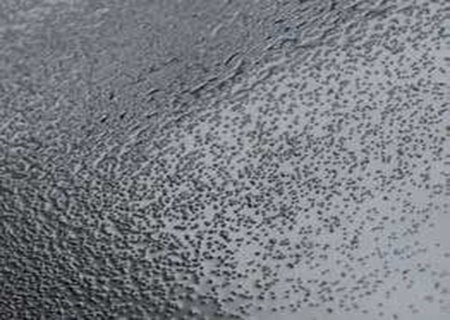
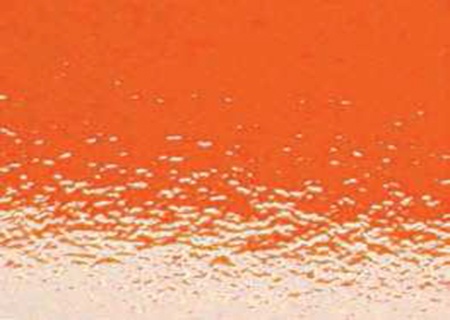
Haloes
DESCRIPTION
The surface shows different colour shades (edges, lower panels).
CAUSES
1. Poor hiding power, depending on insufficient film thickness due to:
– Unsuitable application techniques, especially in the least accessible zones.
– Too few coats applied. Insufficient or non uniform coats.
– Low covering colour requiring a specific coloured undercoat.
– Incorrect mixing ratio and/or low viscosity.
2. Too short flash-off between coats or before the clear coat application.
3. Thick or thin basecoat application.
REMEDY
– Sand slightly and recoat.
– If some haloes appear when spraying, spray in a uniform method.
PREVENTION
– Use appropriate application techniques to reach a correct film thickness on the whole surface.
– Apply a recommended number of coats as indicated on the technical data sheet.
– Always check if the finishing coat needs a coloured undercoat: if this is the case always apply the specific coloured undercoat.
– Always stir paint thoroughly and filter it before application.
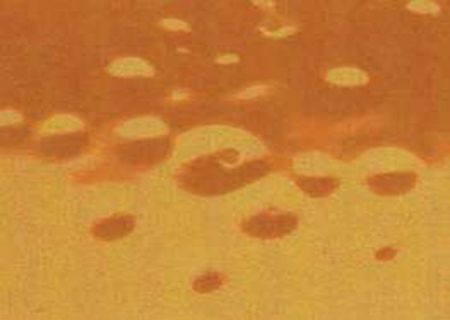
Bubbles
DESCRIPTION
Bubble shaped irregular blemishes. Can be due to:
– corrosion.
– drying.
– air trapping.
CAUSES
Due to drying:
1. High film thickness.
2. Too fast hardeners and/or thinners.
3. Too short flash-off.
4. Too high IR temperature.
5. Too short flash-off in wet-on-wet process.
Due to air trapping:
1. Insufficient priming coat application.
2. Insufficient flash off time between primer and topcoat.
3. Air pockets in the priming coat due to unsuitable thinner.
4. Too high drying temperature.
REMEDY
Sand until bubbles and/or rust are removed.
If necessary, apply an anticorrosive primer as soon as possible in order to avoid further corrosion
problems.
PREVENTION
– Repair the damaged parts immediately and apply an anticorrosive primer in order to avoid corrosion.
– Apply the recommended paint layers, use hardeners and thinners as indicated on the technical data
sheet and follow the drying times in order to avoid drying bubbles.
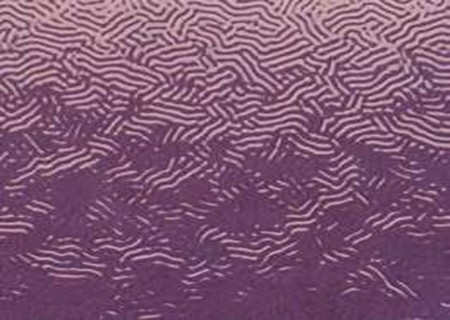
Orange Peel
DESCRIPTION
The painted surface shows poor flow and resembles orange peel.
CAUSES
– Poor spray gun technique (gun held too far from the surface, causing the paint to dry).
– Unsuitable spray gun adjustment (air cap, air pressure, etc).
– Too high spray viscosity.
– Use of too fast or unsuitable thinners.
– Too short flash off between coats.
– Too high surface temperature and/or spray booth temperature.
– Application of too thick or too thin coats.
REMEDY
After the paint has dried through:
– Rub out orange peel with very fine abrasive paper and polish.
– In severe case flat thoroughly and re-spray.
PREVENTION
– Always follow the technical data sheet instructions and use the suggested techniques.
– Use the suggested thinners depending on the room conditions, check the spray viscosity and the air pressure.
– Apply uniform coats and follow the flash off time between the coats.
– Check the room conditions: temperature and ventilation.
Cratering / "Fish Eyes"
DESCRIPTION
Paint repelled by polluting agents, forms crater like depressions with relief edges. Inspection with a
lens may reveal a small impurity at the base.
CAUSES
– Incorrect use of antistatic cleaning cloths that can contaminate the substrate.
– The spray booth and/or the substrate are contaminated with silicone.
– Contaminated compressed air (presence of water, oil, grease, wax).
– Solvent contaminated spray gun when using water-borne products.
REMEDY
Allow through drying:
– Remove by sanding the affected paint, clean thoroughly and re-spray.
– If the paint still forms craters, add a specific anti-silicone to it.
PREVENTION
– Clean and degrease the substrate thoroughly before spraying the next coat, using specific silicone removers. Remove the solvent with clean cloths before it can dry.
– Check the spray booth filters and the oil/water separator and drain if necessary.
– Always check the surface before spraying the next coats; if necessary repeat as indicated above.
– Use only perfectly clean spray equipment.
– Don’t use products containing silicone in the spray booth.
– Clean with suitable solvents and allow spray guns to dry when using water-borne products.
Wrinkling
DESCRIPTION
The paint surface acquires a finely wrinkled appearance.
CAUSES
– Paint applied to a solvent sensitive and/or only partially dry substrate, without previous application of a suitable sealer.
– Use of too aggressive or inappropriate thinner.
– Use of unsuitable sealers for the substrate – In case of two-coat finishes, partial removal of the sealer by sanding, without correct sealing.
– Too high film thickness.
REMEDY
After through-drying:
– In case of a slightly wrinkled surface sand with fine sand paper and re-spray. If the surface shows serious signs
of wrinkling, thoroughly remove the paint and reapply.
PREVENTION
– Ensure that the substrate is not solvent-sensitive and has dried through. If it is the case, seal completely with a suitable sealer (e.g. a water thinnable sealer).
– It is possible to apply a two-pack sealer in very thin coats to sensitive substrates, allowing long flash-off times between coats.
– Use only the recommended hardeners and thinners.
Don’t see your paint problem listed here?
Don’t worry … contact us for more help!


